Frequently used git commands16 min read
Have you just landed your dream job as a programmer? Congrats! We can have different backgrounds and work on different tech stacks. However, no matter which technologies you use, working with Git commands is an indispensable part of any programmer. Perhaps most of us already know about it and have done some Git commands while working on a project. In my experience, I experienced Git when I was doing some school projects. At that time, because there was only me and a single branch, just some basic Git commands were enough to get the job done.
Use .gitignore file and restrict git add .
Back when I was working on a project at my school, for every project if some changes are ready to commit, I use git add . to include all of these changes to the staging area so that these changes are willing to commit, there is no problem with that, of course, when I was working alone, the project is simple, and there are one or two branches.
However, when you do some real work with other people, such as your friends or colleagues, you need to make sure what changes you need to add and what is not supposed to. Only added changed files for your developing feature and nothing more, most of the time you might want to discard all the configuration files you have changed, all the IDE-specific files such as .idea, .metadata, the build and target folder when you build Java project with Gradle, etc…To do so, you simply create a .gitignore file in your working branch (in case there is no .gitignore file yet), and add some location of files and folders you don’t want to commit. For example:
bin/
build/
.gradle
.gradletasknamecache
gradle-app.setting
!gradle-wrapper.jar

out/
.idea/
.idea_modules/
*.iml
*.ipr
*.iws
In this example, I ignore all the auto-generated Gradle and IntelliJ files and folders and they will never be added in the changes if I make a push to my remote repository.
To see whether which files you have changed or just created and not yet committed, you can use a very handy command git status, for example:

So here the editor shows me there are 3 files I have modified but not yet commit, I modified the first and the last one, and the second one was deleted. Now I can choose which one I want to add, and add each file manually:
git add .metals/metals.h2.db
Once you add this file to the staging area, it’s now ready to commit:
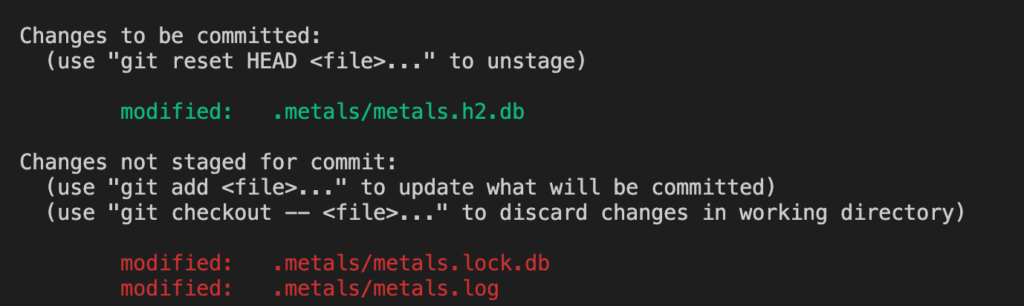
The green line means the change has been added to the staging area and is ready to commit, the red ones indicate that these files have been modified by you, but you haven’t added these to the staging area.
Reset your last commit
This can happen a lot when you need to undo your last commit; the reason for that can vary, however; for beginners, some of the most common mistakes are adding the wrong or an incorrect number of files, commit messages are too obscure or too negligent, or misuse of git add ., etc…Don’t freak out; you can easily reset your last commit with this simple command:
git reset --soft HEAD~1HEAD refers to the current branch, and HEAD~1 means referring to your last commit on this branch, the reset command with the --soft flag essentially preserves all the changes you have made in the last commit. The whole command git reset --soft HEAD~1 make your last commit undone and preserve all the changes you have made in the last commit.
However, in case you somehow want to undo your last commit and also discard all the changes you have made from this commit, simply replace the --soft flag with the --hard one.
Create and switch to a new branch
Obviously, during the development process, you need to create a new branch for your own feature, create a new branch and switch to a new branch can be done with this command:
git checkout -b <your-new-branch-name>For example git checkout -b feature will create a new branch named feature and switch to this specific branch.
The -b flag with git checkout is for creating a branch new branch, but if you want to check out to an existing branch, use git checkout <your-branch-name>.
Undo all the changes that haven’t been committed in existing files
You cannot checkout to another branch from the current branch if there are any changes that haven’t been committed. To switch to another branch, there are two feasible options you can do: either you discard all these changes and switch to the new branch, or you can “stash” these changes, then switch to another branch and commit these changes when you’re ready. Let’s talk about the first option first, for example, in your current branch you have some files test1.txt, test2.txt and test3.txt all of these files have been modified by you, but they are not committed; you can discard all changes in these files with this simple command:
git checkout .This command will reset the content of the files you have modified into the previous commit, anything new that doesn’t belong to this commit will be lost; you have a file named text.txt and currently, here is what we have inside this file:
This is the first line.
This is the second line.
Presume this file has been committed, I want to add some changes to this file:
This is the first line.
This is the second line.
This is the third line // newline.
Now I do git checkout ., the third line will be gone; everything in this file from the last commit is now preserved.
However, if you haven’t made any commit or a new file just being added, you don’t need to use git checkout . to switch to another branch and git checkout. Only remove changes in files that have been committed before; it does not affect a newly created file.
Change the message of your last commit
You just committed a wrong commit message. Don’t worry; you can easily rewrite your last commit message with this command:
git commit --amendThen, some Vim or GNU shell will appear and let you change the commit message.
Make some small changes to your last commit message
You commit a change, and then you realize that you need to make some small adjustments, such as fixing some typo, creating a new file, etc…but you think it’s negligible to make the change as the new commit. You can try out this command to add new changes to your last commit:
git add . # or add individual files
git commit --amend --no-edit
Stash your commit and then use it later
The second option to switch to another branch while some changes haven’t been committed yet is by using first something similar to git checkout . however, with this command, your modified files will be stored somewhere so that you can reapply these changes later on (even on a different branch). This command comes in handy when there is haft-done work done, and you hesitate to create a new commit in this messy state.
So you can stash your commit somewhere with the git stash command; in the future, if you want to take it out and use it, simply take this command:
git stash popThis command takes you back all changes you have made since the last commit. Popping it removes the changes in your stash and reapplies them to your working branch.
Nonetheless, if you want the changes you stash work like a template that can be reusable multiple times on multiple branches, you can use this command instead:
git stash applyThis command helps you reapply the changes you have made, and it also keeps these changes in the stash so that you can refer to them later.
Undo commits have been pushed to the remote
Sometimes, you create some commits and push them to remote, and then you soon realize that you and your colleagues are unhappy about this. In this case, you want to discard all changes you’ve made and revert to the previous commit. There is a simple command for this purpose:
git revert <commit-hash>Every commit you make will be associated with a hash code that uniquely identifies your commit. To find out the commit hash of your last commit, you can use this command:
git logTypically, this simple command will suffice if you just want to know the commit hash of the last commit, it will offer you some pieces such as the commit hash, the author who made this commit, the commit message and some other metadata…For example, I type git log on one of my Git repo:
commit 3a732b87b0a701d91ea212bd5944ea3013f871b7 (HEAD -> master, origin/master)
Author: Nam Van Do <[email protected]>
Date:   Sun Feb 21 19:06:30 2021 +0700

    new commit

commit 6fb1919322feeafd1684fa5d5c1fb3bbc4ab7513
Author: Nam Van Do <[email protected]>
Date:   Mon Feb 8 21:44:52 2021 +0700

    Third commit
Now, I want to revert my last commit which is associated with the “new commit” message, I can simply do:
git revert 3a732b87b0a701d91ea212bd5944ea3013f871b7After you finish this, you can push your revert commit to the remote (presume you’re on the master branch):
git push origin masterAnd you’re done. However, this reverted commit is separate, and it doesn’t override the bad one; people still can look at the history and inspect your bad commit. If you want to take more intensive actions such as completely erasing history, you can do some research on the internet.
git reflog vs. git log
There is another command for showing the commits information besides git log, which is git reflog. Well, in a nutshell, while git log gives you information on every public commit of the current branch (your last, second, third…pushed commit, and so on), and other people can see it, git reflog offers you the commits of your private local repository that cannot be seen without physical access. In other words, the git log contains all shiny public commits and git reflog contains all commits from your local repo, including git reset, git amend stuff. For a quick demo of the difference between git log and git reflog, I perform the git reset on my first commit to my current branch to see what happens (there are several newer commits above this one):
git reset 5ee7edb593ec809aac5ece012d66dd0b49864173This is the hash of my very first commit. Then I type git log:
commit 5ee7edb593ec809aac5ece012d66dd0b49864173 (HEAD -> master)
Author: Nam Van Do <[email protected]>
Date:   Mon Feb 8 21:41:13 2021 +0700

    Init commit
OK, now the head is moved back to my initial commit, it seems like nothing much happening here except this one. Let’s type git reflog to see what’s difference:
5ee7edb (HEAD -> master) HEAD@{0}: reset: moving to 5ee7edb593ec809aac5ece012d66dd0b49864173
32f3996 (origin/master) HEAD@{1}: revert: Revert "new commit"
3a732b8 HEAD@{2}: commit: new commit
6fb1919 HEAD@{3}: clone: from https://github.com/namvdo/git-demo.git
We can see a clear distinction here: git reflog provides you with all the commits you have made in your local repository.
Merge multiple commits into one
You propose a review, the reviewer looks at your code, and he says that you might make some changes; otherwise, your code will not be merged; then you create some changes and commit again to fix your deficit, and again and again, many commits are being added. You don’t like this lengthy commit history, and your reviewer, indeed, doesn’t like this either. In this case, git rebase can be your friend.
For example, I want to merge multiple commits into one commit. First off, I type the command git log –pretty=oneline to see my public commits concisely:
e9bf1386e4917bdea954df67aaf1d89a4126f272 another commit ------
32f39967f95d38391b2b2083a202a3fc71ab9f19 Revert "new commit" |
3a732b87b0a701d91ea212bd5944ea3013f871b7 new commit          |
79cb0ac4ef093da45d827064ec210d6dbc6e4906 Third commit        |
8b5914a17252f304ee97f226f3eb30f6f0a6ba40 Second commit       |
84564c77031f3b0a6008cc56d5463112e93ab096 Init commit         |
6fb1919322feeafd1684fa5d5c1fb3bbc4ab7513 Third commit        |
8611986f89904a2c3d092bece8421c922b2408c9 Second commit -------
5ee7edb593ec809aac5ece012d66dd0b49864173 Init commit
Here, I want to join all the commits from the top till the way down the commit with the “second commit” message; this is what I can do:
git rebase -i 5ee7edb593ec809aac5ece012d66dd0b49864173I provided the commit hash of the commit that is just before the one I want to rewrite. A new interactive shell will show up like this:
pick 8611986 Second commit
s 6fb1919 Third commit
s 84564c7 Init commit
s 8b5914a Second commit
s 79cb0ac Third commit
s e9bf138 another commit
s 3a732b8 new commit
s 32f3996 Revert "new commit"

# Rebase 5ee7edb..13cb10e onto 32f3996 (8 commands)
#
# Commands:
# p, pick <commit> = use commit
# r, reword <commit> = use commit, but edit the commit message
...
This shell displays the commits in the reversed order; the oldest commit will be on top, and the newest commit will be way down at the bottom. Here, I want to pick the oldest commit and squash all newer commits into this commit, s here means squash.
A new window will pop up so that you can choose what message you want to include in your squashed commit; after doing so, you can type git log --pretty=oneline again and see the result:
f12e779570dd9c7a797ad1e1de082399a3cbc7d5 Squashed commit
5ee7edb593ec809aac5ece012d66dd0b49864173 Init commit
Now you’re ready to push your commit to the remote. However, because you have made some rewriting history (rebasing), you need the --force flag to push your new changes to the remote:
git push --force origin HEADIf this process seems a little bit convoluted to you, Github lets you squash and merge with a few clicks. First, go to your repo and desire branch, and click “Create Pull Request,” from this page, you can choose the “Squash and Merge” option:
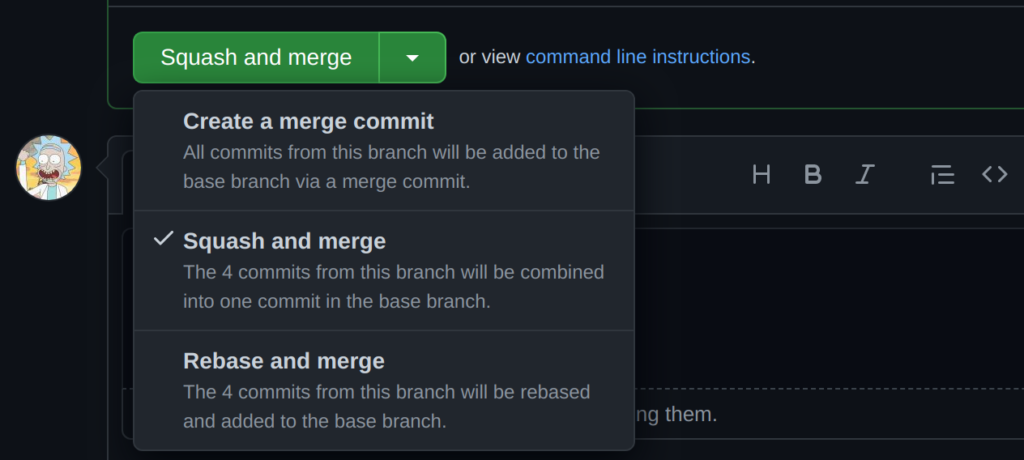
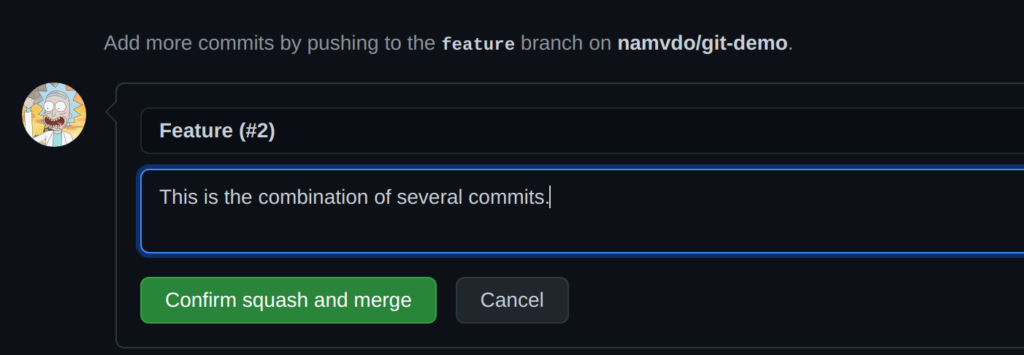
Then you simply provide the message for this commit and click to “Confirm squash and merge” then you’re done:
Delete your local and remote branch
Oh, shit, you mess everything up in the current branch; you feel tired of conflicting, rebasing, resetting, amending, and all of this stuff. At this point, this can be a little bit weird, but some Git delete commands will likely be your reluctant friend; you want to delete your branch and start over! Here is the simple command for deleting your local branch:
git branch -d <your-branch-name>However, to perform this action, you first need to switch to another brand and then use the command above. Notice the -d flag for deleting the branch, Git would delete this branch only when this branch’s code has already merged to your current branch. Otherwise, Git will display some warnings and won’t let do this.
If you’re tenacious enough, you want to delete your local branch anyway. No matter what, you can use the -D flag instead, for example git branch -D feature will delete my feature branch no matter whether it’s merged into the current branch or not.
Your branch is now erased on your local machine, yet it may still exist in the remote, to delete the corresponding branch you’ve just deleted on the remote, use this command:
git push origin --delete <branch-name>E.g: git push origin --delete feature
What is the origin anyway?
We are familiar with the idiom of git push origin master to push something new to the master branch, but what’s the meaning of the word origin here? Actually, it’s an alias for your remote repository’s URL, so you can use this name instead of typing a long URL in your command line. And of course, it’s perfectly fine to do so:
git push [email protected]:git/git.git masterThe word origin itself is not a magic value of some kind. It’s just a convention that people use, and you can use a different name if you like. To examine which word refers to your remote repository’s URL, use git remote -v command, which will give me this:
origin  https://github.com/namvdo/git-demo.git (fetch)
origin  https://github.com/namvdo/git-demo.git (push)
To change origin to something else, you can use this command:
git remote set-url <remote_name> <remote_url>For example:
git remote rename origin homnaytoibuonThen use git remote -v again to see changes:
git remote -v
homnaytoibuon   https://github.com/namvdo/git-demo.git (fetch)
homnaytoibuon   https://github.com/namvdo/git-demo.git (push)
Now I can start using a new alias to push something new to my remote:
git push homnaytoibuon masterChange the URL/URI for a remote Git repository
To change the URL of the remote repository which origin refers to, here is the command:
git remote set-url origin your.new.url/hereIf you push something to remote using this alias, notice your newly set remote URL will be used.
