A Great Introduction to Threads in Java – How to create your own thread13 min read
In the operating system terminology, a thread is the smallest unit of execution schedulable by an operating system’s scheduler. A process can be made up of one or many threads, each thread can work independently to perform some tasks. For example, a program can have a thread to perform the main work, and one other thread to display the current time has elapsed since you open the program, both can work independently.
Java is a multi-threaded language, which means if a program executes, there can be multiple threads run concurrently and each one undertakes a specific task.
When you run a Java program, there is always at least one thread, which is the main thread and this is created automatically inside the main method by Java Virtual Machine.
Table of Contents
Create a new thread
There are 2 ways for us to create a new thread in Java:
- extends the
Threadclass - implements the
Runnableinterface
Create a new thread by extending Thread class
With the first approach, to create new custom thread, we should declare a class which is the subclass of the Thread class and overriding its run() method:
public class HelloThread extends Thread {
    public void run() {
        System.out.println("This message is printed out from the " + Thread.currentThread().getName() + " thread.");
    }

    public static void main(String[] args) {
        HelloThread thread = new HelloThread();
        thread.start();
        System.out.println("This message is printed out from the " + Thread.currentThread().getName() + " thread.");
    }
}
Let’s carefully examine the code above:
- First, we create a new thread by making the
HelloThreadclass as the subclass of theThreadclass. - Next, in the
HelloThreadclass, we must override therunmethod of the parent thread to work with newly created thread. - Inside the
run()method, we simply print out an informed string. Here notice thatThread.currentThread()will give us the reference executing thread object and thenThread.currentThread().getName()will give us the name of this thread. - Right below in the main method, we create a new instance of the
HelloThreadclass. - The
run()method makes a thread ready to run, but in order to make a thread starts its execution, we need to call thestart()method of the Thread object. - At the bottom of the main method, we simply print out a string as we did in the
run()method above, but notice that now the message is in themainthread.
If we run this code, here is the output:
This message is printed out from the Thread-0 thread.
This message is printed out from the main thread.
As we can see, these two messages are printed in two completely different thread, one with name as Thread-0 and one in the main thread.
If you want your custom thread has a different name rather than Thread-0, Thread-1, etc…You can pass your own desired name for your thread to the Thread constructor using the super keyword:
public class HelloThread extends Thread {
    HelloThread(String name) {
        super(name);
    }

    public void run() {
        System.out.println("This message is printed out from the " + Thread.currentThread().getName() + " thread.");
    }

    public static void main(String[] args) {
        HelloThread thread = new HelloThread("My Favorite Thread");
        thread.start();
        System.out.println("This message is printed out from the " + Thread.currentThread().getName() + " thread.");
    }
}
Create a new thread by implementing the Runnable interface
The second approach we can consider here is to create a new thread with the Runnable interface, you also need to override the run() method and pass the implementation to the Thread constructor:
public class HelloThread implements Runnable {
    public void run() {
        System.out.println("This message is printed out from the " + Thread.currentThread().getName() + " thread.");
    }

    public static void main(String[] args) {
        Thread thread = new Thread(new HelloThread());
        thread.start();
        System.out.println("This message is printed out from the " + Thread.currentThread().getName() + " thread.");
    }
}
This code will work exactly the same as we did in the first example. Besides a constructor for renaming thread, the Thread class also has another constructor accepting a Thread object.
Either you create a new thread by extending Thread class or implementing Runnable interface, you always need to override the run() method. In essence, we have to do so because the Thread class implements the Runnable interface.
You also are able to rename the thread by passing the desired name as the second parameter to the Thread constructor:
Thread thread = new Thread(new HelloThread(), "My Cool Thread");The Runnable interface only has a single method run(), every interface with just one abstract method is called a functional interface. So we can make use of the lambda expression to make the code looks more concise:
public class HelloThread {
    public static void main(String[] args) {
        Thread thread = new Thread(() -> {
            System.out.println("This message is printed out from the " + Thread.currentThread().getName() + " thread.");

        });
        thread.start();
        System.out.println("This message is printed out from the " + Thread.currentThread().getName() + " thread.");
    }
}
Extend Thread or Implement Runnable?
Java is a single inheritance language, if a class extends one superclass, then it’s impossible for this subclass to extend any other class. For example, we have the class A extending the Thread class:
class A extends Thread {
 // implentation goes here...
}
Now if we want the class A also extends class B, this will be invalid:
class A extends Thread, B { // invalid

}
Instead of extending the Thread class, you can obtain the fancied result by implementing the Runnable interface. But there is no right or wrong about these 2 approaches, you can choose which one based on your preference.
The start() and run() methods
As aforementioned, a thread is eligible to run when you override the run() method whether by extending the Thread class or implement the Runnable interface, notwithstanding, to convince a thread to actually execute, you need to call the start() method. The invocation of the start() method is requisite if you want to execute the code inside the run() method inside another thread. If you invoke the run() method directly, the code enclosed by the run() method will run on the same thread:
public class HelloThread extends Thread {
    public void run() {
        System.out.println("This message is printed out from the " + Thread.currentThread().getName() + " thread.");
    }

    public static void main(String[] args) {
        HelloThread thread = new HelloThread();
        thread.run();
        System.out.println("This message is printed out from the " + Thread.currentThread().getName() + " thread.");
    }
}
Output:
This message is printed out from the main thread.
This message is printed out from the main thread.
So what we did here is directly call the run() method in the main method, that’s why we get the same thread name.
If we replace the run() method with the start() method again, then the code will work as we did in some previous example, nonetheless, if you try to run the code several times, perhaps you will get the different results for each execution. This happens because when you start a thread with the start() method, the thread doesn’t always start immediately, as demonstrated by the picture below:
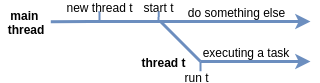
As we can see, there is maybe a delayed period after calling the start() method.
Once a thread has started by invoking the start(), any attempt to restart the thread by calling the start() method again in this thread will raise a IllegalThreadStateException exception:
HelloThread thread = new HelloThread();
thread.start(); // ok for the first try
thread.start(); // raises an exception.
Thread Priority
Every thread in Java has a priority ranging from 1 (lowest) to 10 (highest), threads with higher priorities will take precedence over threads that have lower priorities. By default, the priority of a thread is 5, but we still can change it afterward. There are 3 constant defined in the Thread class:
public static int MIN_PRIORITY // 1
public static int NORM_PRIORITY // 5
public static int MAX_PRIORITY // 10
To get the priority of a thread, we use the getPriority() method. To change the priority of a thread, we can use the setPriority(int newPriority) and pass a new priority from 1 to 10 to this method.
public class ThreadPriorityDemo extends Thread {
    public void run() {
        System.out.println("This message is printed from: " + Thread.currentThread().getName() + " thread.");
        System.out.println("The thread priority is: " + Thread.currentThread().getPriority());
    }

    public static void main(String[] args) {
        ThreadPriorityDemo thread1 = new ThreadPriorityDemo();
        ThreadPriorityDemo thread2 = new ThreadPriorityDemo();
        thread1.setPriority(Thread.MIN_PRIORITY);
        thread2.setPriority(Thread.MAX_PRIORITY);
        thread1.start();
        thread2.start();
    }
}
If we run this code, we might get an unexpected result like this:
This message is printed from: Thread-1 thread.
This message is printed from: Thread-0 thread.
The thread priority is: 10
The thread priority is: 1
We can easily deduce that because we have set the max priority to the second thread, then it will take the precedence and executed first. However, the message The thread priority is: 10 wasn’t printed right after the first one, instead, we got This message is printed from: Thread-0 thread.
This peculiar output happened because as we talked in the right at the beginning of this article. Threads are managed and scheduled by a thread scheduler which is a part of JVM. There is something called “Time-slicing” which basically means that each thread in the thread pool is given a fixed portion of time, after the given time has elapsed, even this thread hasn’t finished its executions, the scheduler still decides to move on and giving resources to execute the next waiting thread. The executing cycle keeps repeating until there is no non-daemon thread left, which we learn right below.
When is a Program Stop Executing? Non-daemon thread and daemon-thread
There are 2 types of thread in Java:
- Non-demon thread: a thread marked as the non-demon thread is a salient thread in a program and its job is to execute the main function of this program. When an application starts running, there is one non-daemon thread and whose job is to execute the
main()method. - Demon thread: is designated for running some general services in the background such as displaying the current date and time, and it’s not a vital part of the program.
Once all non-demon threads in a program have died, the program will be terminated even there are still some demon threads running. Conversely, if there is still a non-demon thread running, then the program will not terminate. Let’s examine the code below:
public class NonDaemonDemo extends Thread{
    public NonDaemonDemo() {
        setDaemon(true);
    }
   public void run() {
        for(long i = 1; i < 5_000_000_000L; ++i) {
            if (i % 1_000_000_000L == 0) {
                System.out.println("Hello from " + Thread.currentThread().getName());
            }
        }
   }
   public static void main(String[] args) {
        NonDaemonDemo thread = new NonDaemonDemo();
        thread.start();
        for(int i = 0; i < 100; i++){
            if (i % 20 == 0) {
                System.out.println("Hello from main!");
            }
        }
   }
}
When we run this program above, we will get a little surpising result like this:
Hello from main!
Hello from main!
Hello from main!
Hello from main!
Hello from main!

Process finished with exit code 0
As we learned earlier, starting a thread doesn’t guarantee this thread will immediately execute, in this case, the code inside the main() method is executed first. Once main() method finishes its job by printing out some messages to the console, then this non-demon thread will die, the program then will shut down because there is no non-daemon thread left.
Notice that a thread created by a non-daemon thread initially a non-daemon thread, a thread created by a daemon thread initially a daemon thread. Hence, the thread object created inside main() method was initially a non-daemon thread, that’s the reason why we called setDeamon(true) to switch a thread from non-daemon to daemon for demonstrating the example above.
If we remove the code from the constructor of NonDaemonDemo, here is what we get:
Hello from main!
Hello from main!
Hello from main!
Hello from main!
Hello from main!
Hello from Thread-0
Hello from Thread-0
Hello from Thread-0
Hello from Thread-0

Process finished with exit code 0
Because now we have 2 non-demon threads, then the program is terminated only when both of them have finished its execution. You can examine whether a thread is a daemon or non-daemon by using the getDaemon() method:
public class NonDaemonDemo extends Thread{
   // code surpassed for brevity
   public static void main(String[] args) {
        NonDaemonDemo thread = new NonDaemonDemo();
        thread.start();
        System.out.println(thread.isDaemon()); // false;
   // code surpassed for brevity
   }
}
A Multithreading Example
We have created some multithreading examples above, but it just prints out some messages and do nothing much. Let’s create a program with 2 threads, the main thread will occasionally print out the current date and time, and one custom thread it takes 2 real numbers from standard input and put these numbers in the linear equation ( ) and prints out the result, both can work simultaneously:
import java.text.DecimalFormat;
import java.util.Scanner;

public class LinearEquationWorker extends Thread {
    LinearEquationWorker() {
        setDaemon(true);
    }

    public final Scanner sc = new Scanner(System.in);

    public void run() {
        while (true) {
            double num1 = sc.nextDouble();
            double num2 = sc.nextDouble();
            DecimalFormat decimalFormat = new DecimalFormat("#.##");
            if (num1 == 0 && num2 == 0) {
                break;
            }
            System.out.println("The result of " + decimalFormat.format(num1) + "x + " + decimalFormat.format(num2) + " = 0 is: " + decimalFormat.format(-num2 / num1));
        }
        System.out.println("Thread " + Thread.currentThread().getName() + " has finished.");
    }
}

class Main {
    public static void main(String[] args) {
        LinearEquationWorker thread = new LinearEquationWorker();
        thread.start();
        for (long i = 0; i < 50_000_000_000L; ++i) {
            if (i % 10_000_000_000L == 0) {
                System.out.println("Current time is: " + java.time.LocalDateTime.now());
            }
        }
    }
}
The output might look similar to this when you run the code, however, the time, of course, would be dissimilar!
Current time is: 2020-06-29T15:44:16.210682
2 3 // enters 2 numbers from standard input
The result of 2x + 3 = 0 is: -1.5 // get the result
5 7
The result of 5x + 7 = 0 is: -1.4
Current time is: 2020-06-29T15:44:32.091767
5 -5
The result of 5x + -5 = 0 is: 1
Current time is: 2020-06-29T15:44:48.018156
0 0
Thread Thread-0 has finished.
Current time is: 2020-06-29T15:45:05.442255
Current time is: 2020-06-29T15:45:22.174817

Process finished with exit code 0
As we can see, while the main() method trying to compute some operations, then we can at the same time enter 2 numbers put them to a function, and get the result after computing from a different thread. Even though the Thread-0 has done its job, the program still running because the non-daemon thread in the main() method still strenuously performs some calculation.
Summary
Now, let’s quickly recap what we have learned:
- A thread is the smallest unit execution in the OS, a process can contain one or more threads.
- Java is a multithreaded language, which means a program can hold more than one thread, each can work independently.
- There are 2 ways to create a custom thread, by extending the
Threadclass orRunnableinterface and override. Both need to override therun()method. - The
start()method is used to start the execution of a thread, however, it doesn’t immediately start this thread. - A thread can only start once. If there is any attempt to restart the thread, then an exception will occur.
- Every thread has a priority, ranging from 1 (lowest) and 10 (highest). You can alter the thread’s priority by using the
setPriority()method, and get a thread’s priority with thegetPriority()method. - There are 2 types of thread – daemon, and non-daemon. The program will be terminated if there is no non-daemon thread left.
There are still a host of things to learn about threads in Java. In the next articles, we will explore some deeper concepts such as states of threads, thread management, thread synchronization, and much more. If you enjoy reading my post, consider subscribing to the newsletter to receive weekly updates.
