A Detailed Guide To Create A Simple Todo-list with plain JavaScript for Absolute Beginners18 min read
Building projects are a great way to learn and consolidate your knowledge, and usually, it’s better to learn by usage rather than memorization. This is the reason why I have created a series about hands-on JavaScript projects for beginners, for each tutorial I will try to guide and explain the concepts in a straightforward and comprehensible way. Projects in this series might be simple, but I guarantee each of them has a real application and demonstrates the most important concepts in JavaScript.
In this article, let’s started to build a common project which is the to-do list app. It might be tedious, however, through this project, we will learn some useful concepts with just plain JavaScript such as DOM manipulations because we will work with DOM intensively in this project.
But before we start, make sure that you have some prior knowledge about HTML, CSS, JavaScript and a basic understanding of the DOM.
Table of Contents
Features and Sketches
To start off, let’s define the list of features our to-do list app has:
- Add a task
- Edit a task
- Mark tasks as done
- Delete a task
- Clear all tasks
First off, out to do list app must need an option that we can add a task to the list, and later on, we can edit the task as we want. Next, after finishing a task, we should mark it as complete and move this task to another section. Also, we want to make our app more flexible, so we add another option to delete an unfinished task. After all, when the list becomes too verbose, we have a last option to clear all the tasks, both completed and uncompleted.
Before we dive in the coding process, let’s quickly sketch the outline of what we gonna do:
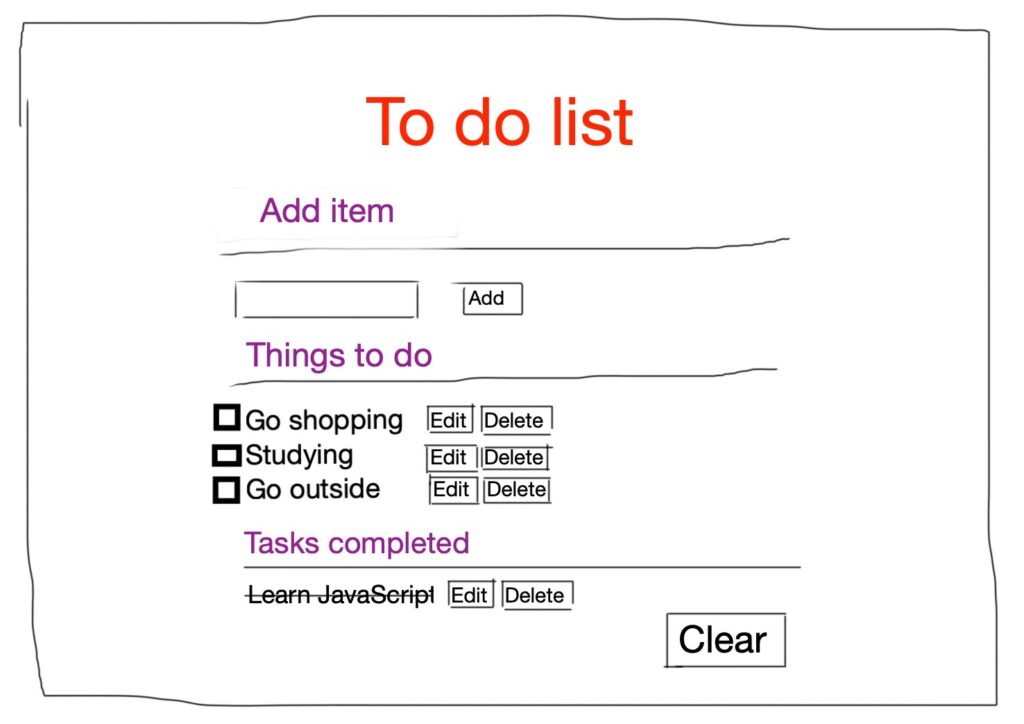
We first quickly create a HTML page which resembles to what we sketched, then we can add some styling to make the app a little more attractive, you can come up with your own CSS to make it nicer if you want. Finally, we slowly add some JavaScript code which orchestrate those features we have listed.
HTML Page
Initially, we create an HTML page for what we intend to do, which is a to-do list. This HTML page should have some text displaying information about each section, i.g Add section, To-do section, and Completed section. Also, we need to add some buttons for editing, deleting and clearing the content.
<html lang="en">

<head>
    <meta charset="UTF-8">
    <meta name="viewport" content="width=device-width, initial-scale=1.0">
    <title>To-do list</title>
    <link rel="stylesheet" href="style.css">
</head>


<body>

    <div class="container">
        <div class="section1">
            <h1 id="title">TO DO LIST</h1>
            <p>
                <label for="new-task">Add Tasks</label>
                <input id="new-task" type="text">
                <button>Add</button>
            </p>
        </div>
        <div class="section2">
            <h3>To-do</h3>
            <ul id="incomplete-tasks">

            </ul>
        </div>
        <div class="section3">
            <h3>Completed Tasks</h3>
            <ul id="completed-tasks">
                <li>
                    <input type="checkbox" checked="">
                    <label>Learn JavaScript</label>
                    <input type="text">
                    <button class="edit">Edit</button>
                    <button class="delete">Delete</button>
                </li>
            </ul>
        </div>
        <div class="section4">
            <button id="clear">
            <p>Clear</p>
            </button>
        </div>
    </div>
    <script src="script.js"></script>
</body>


</html>
This is done for our HTML file. You should familiar with HTML code above and easily understand what it’s about. We have created a div container to hold all of our main elements, inside this div we have 4 sub divs for each section of the page. We need to retrieve the HTML element in our JavaScript file, hence the ids we define here make this process easier. We also have linked to a CSS file and a JavaScript named style.css and script.js respectively.
Stying with CSS
Before jump into JavaScript, to make the app is little more attractive, we need to decorate our page by using CSS. You can custom the CSS page if you want:
/* Basic Style */
body {
background: #fff;
color: #333;
font-family: Lato, sans-serif;
background: #B2FEFA;
/* fallback for old browsers */
background: -webkit-linear-gradient(to right, #0ED2F7, #B2FEFA);
/* Chrome 10-25, Safari 5.1-6 */
background: linear-gradient(to right, #0ED2F7, #B2FEFA);
/* W3C, IE 10+/ Edge, Firefox 16+, Chrome 26+, Opera 12+, Safari 7+ */
}
#title {
margin-top: 5px;
font-size: 50px;
font-family: Impact, Haettenschweiler, 'Arial Narrow Bold', sans-serif;
text-align: center;
}
.container {
display: block;
width: 40vw;
margin: 50px auto 0;
}
ul {
margin: 0;
padding: 0;
}
li * {
float: left;
}
li,
h3 {
clear: both;
list-style: none;
}
input,
button {
outline: none;
}
button {
background-color: #008CBA;
border: none;
color: white;
padding: 15px 32px;
text-align: center;
text-decoration: none;
display: inline-block;
padding: 5px;
margin: 5px;
font-size: 13px;
border-radius: 10%;
}
button:hover {
background: #2079b0;
text-decoration: none;
cursor: pointer;
}
/* Heading */
h3,
label[for='new-task'] {
color: #333;
font-weight: 700;
font-size: 15px;
border-bottom: 2px solid #333;
padding: 30px 0 10px;
margin: 0;
text-transform: uppercase;
}
input[type="text"] {
margin: 0;
font-size: 18px;
line-height: 18px;
height: 18px;
padding: 10px;
border: 1px solid #ddd;
background: #fff;
border-radius: 6px;
font-family: Lato, sans-serif;
color: #888;
}
input[type="text"]:focus {
color: #333;
}
/* New Task */
label[for='new-task'] {
display: block;
margin: 0 0 20px;
}
input#new-task {
float: left;
width: 318px;
}
/* Task list */
li {
overflow: hidden;
padding: 20px 0;
border-bottom: 1px solid #eee;
}
li>input[type="checkbox"] {
margin: 0 10px;
position: relative;
top: 15px;
}
li>label {
font-size: 18px;
line-height: 40px;
width: 237px;
padding: 0 0 0 11px;
}
li>input[type="text"] {
width: 226px;
}
li>.delete:hover {
color: #CF2323;
}
/* Completed */
#completed-tasks label {
text-decoration: line-through;
color: #888;
}
/* Edit Task */
ul li input[type=text] {
display: none;
}
ul li.editMode input[type=text] {
display: block;
}
ul li.editMode label {
display: none;
}
#clear {
font-size: 15px;
float: right;
text-align: center;
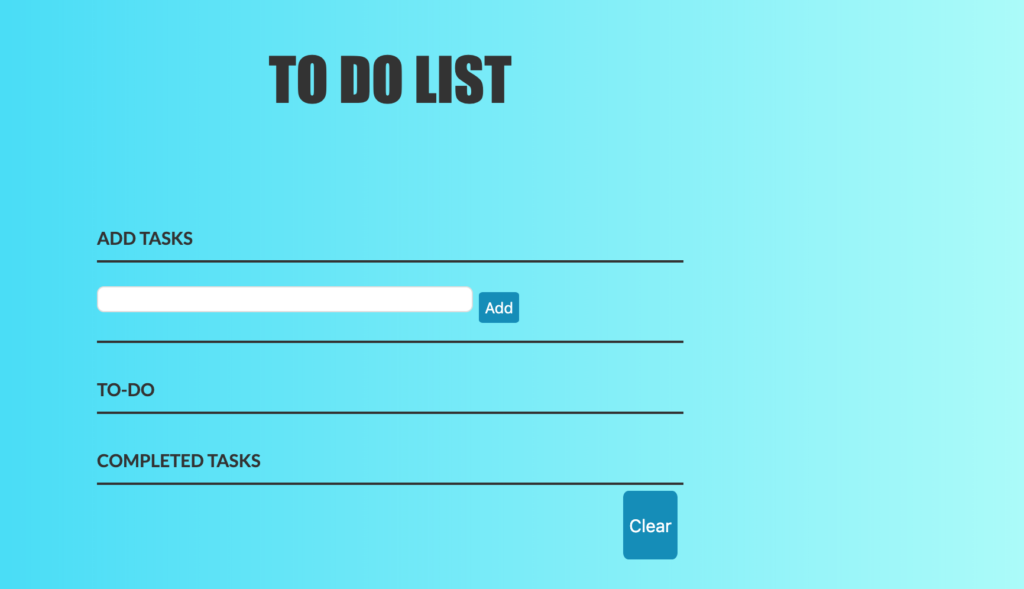
}We’ll get this result of we run this code:
Interactivity with JavaScript
Initial Selected Elements
To make our to-do list usable, we need to write JavaScript. As we can see in the image above, we need to add a new task, make it available to the to-do section, move it to the completed-tasks section if it marked as complete, then delete all the visual display items from the to-do and the complete tasks after the clear button is clicked. To facilitate those activities, we select the corresponding elements as we do right here inside the JavaScript file:
let taskInput = document.getElementById("new-task"); // new-task
let addButton = document.getElementById("addButton"); //first button
let incompleteTasks = document.getElementById("incomplete-tasks"); //incomplete-tasks
let completedTasks = document.getElementById("completed-tasks"); //completed-tasks
let clearButton = document.getElementById("clear");
Add To-do
The next thing we need to do is to create the first method which lets us add a task to the to-do list:
let addTask = function() {
    if (taskInput.value == "") {
        alert("Task to be added should not be empty!");
        return;
    }
    let listItem = createNewTask(taskInput.value);
    incompleteTasks.appendChild(listItem);
    bindTaskEvents(listItem, taskCompleted);
    taskInput.value = "";
}
Let’s break down what happens here. First, we check whether to enter a non-empty task, if so, we proceed the next lines, otherwise we alert that the input should not empty and return.
Then we create a variable listItem which holds a task element. Because a task element may involve some other elements such as an edit button or a delete button, hence we create a function to make our addTask function less cumbersome. This createNewTask function takes one argument, which is a task we type in. Remember the incompleteTasks element? In the seventh line, we append listItem as a new child element li to the incompleteTasks which itself is a ul tag element by appendChild method. On line ninth, we clear the input after the user hitting the button.
On line eighth, we now call another function which is bindTaskEvents, what this function does is to take 2 argument, first one is the listItem on the 2rd line, and also a function taskCompleted and move the task around between inComplete and completed section. If the task is just added to the to-do section then it hasn’t completed yet, why we pass taskCompleted as the second argument? Let’s find out by look inside the bindTaskEvents and some other related functions.
But before we do it, let’s quickly add a single line of code to bind addButton to the EventListener:
addButton.addEventListener("click", addTask);Every time the addButton is clicked, the addTask function will be called, notice that we don’t have to use () to call a function inside the addEventListener method.
createNewTask function
let createNewTask = function(taskName) {
    // create List Item
    let listItem = document.createElement("li");
    // input checkbox
    let checkBox = document.createElement("input");
    // label
    let label = document.createElement("label");
    // input (text)
    let editInput = document.createElement("input");
    // button.edit
    let editButton = document.createElement("button");
    // button.delete
    let deleteButton = document.createElement("button");

    //Each element needs modified
    checkBox.type = "checkBox";
    editInput.type = "text";
    editButton.innerText = "Edit";
    editButton.className = "edit";
    deleteButton.innerText = "Delete";
    deleteButton.className = "delete";
    label.innerText = taskName;
    listItem.appendChild(checkBox);
    listItem.appendChild(label);
    listItem.appendChild(editInput);
    listItem.appendChild(editButton);
    listItem.appendChild(deleteButton);

    return listItem;
}
We call the createNewTask function on the sixth line of addTask function. This createNewTask function is a utility function for us to create a bunch of new elements, first off we create a new li element and some other elements by using the createElement method, then we use appendChild method again to add some children to this li container. Finally, we return this element, listItem.
If we pass in a value such as “Learn JavaScript” to the createNewTask function, then if this function is called, the return element will look like this:

You can easily inspect your page if you want by using CMD+SHIFT+J (in macOS) or Ctrl+Shift+J(in Windows). There is a tab named “Elements” where elements of the page stored there.
bindTaskEvents function
The function bindTaskEvents is responsible for firing some events such as edit and delete. It also helps us to move an item from the incomplete section to the finished one:
let bindTaskEvents = function(taskListItem, checkBoxEventHandler) {
    // select listitems chidlren
    let checkBox = taskListItem.querySelector('input[type="checkbox"]');
    let editButton = taskListItem.querySelector("button.edit");
    let deleteButton = taskListItem.querySelector("button.delete");
    //bind editTask to edit button
    editButton.onclick = editTask;
    //bind deleteTask to delete button
    deleteButton.onclick = deleteTask;
    //bind checkBoxEventHandler to checkbox
    checkBox.onchange = checkBoxEventHandler;
}
This function takes 2 parameters, the first one is the task item, which is the item we create by the createNewTask method. The second one is used to flip the state of the item, from incomplete to finished and vice versa.
In the third line, the checkBox variable is used to store the element with the type of checkbox, which we can click on or off to mark the item as incomplete or completed. In the lines after, we select the edit and delete buttons (which are elements inside the taskListItem element) and store them to the editButton and deleteButton correspondingly. Keep in mind that the querySelector method only returns the first element that matches the specified selectors. Since our taskListItem just has one checkbox, one edit button, and one delete button, so we don’t need to worry about it much.
Next, we want when users click to the edit button, then it will let users change the content of the task, that’s why onclick comes in and used for this purpose. Both editTask and deleteTask are two other functions, one let us modify the content, the other when is called will make the content vanished.
Let’s recall one line in the addTask function, where we call the bindTaskEvents function:
bindTaskEvents(listItem, taskCompleted);This line of code might be confusing at first, but if you mull over, it will make sense. The bindTaskEvents has 2 parameters, one is taskListItem and one is checkBoxEventHandler, respectively we pass in it two arguments, which are listItem and taskCompleted, now move back to the last line of bindTaskEvents method:
checkBox.onchange = checkBoxEventHandler;If we change the checkBoxEventHandler with the function argument:
checkBox.onchange = taskCompleted;The onchange event will activate when the value of an element has been changed. For checkboxes, the onchange event occurs when the checked state has been changed. Thus, it makes sense when we call the taskCompleted function when the value of the checkbox has been changed.
Edit Task
As we stated, when we click to the edit button, it allows us to change the content of a task, here is how we define the editTask function:
let editTask = function() {
    let listItem = this.parentNode;
    let editInput = listItem.querySelector("input[type=text]");
    let label = listItem.querySelector("label");
    let containsClass = listItem.classList.contains("editMode");

    // if the listItem element contains the editMode class
    if (containsClass) {
        //Switch from .editMode
        //label text become the input's value
        label.innerText = editInput.value;
    } else {
        //Switch to .editMode
        //input value becomes the labels text
        editInput.value = label.innerText;
    }
    //Toggle .editMode class on and off
    listItem.classList.toggle("editMode");
}
Let’s break down this code step-by-step. First off, you need to understand how the this keyword behaves in different scenarios, I already wrote a comprehensive article about the “this” keyword here. We need to trace where the editTask function has been called, now we need to refer back to the line fourth and the seventh line of the bindTaskEvents function:
let editButton = taskListItem.querySelector("button.edit");
editButton.onclick = editTask;
Here the this context referring to is the edit button. Calling this.parentNode returns a parent element of this node, which is a li element, you can also use console.log to see the result.
On the third line, we use the querySelector method to match the input tag with the type of text, this can be either in incomplete or completed section depended on where we call the function (we have 2 other functions taskCompleted and taskIncomplete both call bindTaskEvents function):

On the next line, we select the label, this label holds the content of the task and store to the label variable, we can use the console.log to display those elements to the console:

The classList.cotains method returns true if the listItem element contains the class named editMode, otherwise, return false. Then we check if the editMode class exists, if it does, we set the edit input value to the label text value, otherwise if editMode doesn’t exist, we take the label text as the edit input value. For example:

The classList property returns all the classes of an element and its method toggle will let us toggle on and off a class, in our case, it’s the editMode class. When the edit button is clicked (which we bind the onclick event to this button on bindTaskEvents function), then the editMode class will append to the class list of listItem element, if click again, this class will disappear.
Delete Tasks
Next, we need to find a way to delete a task, we already see the deleteTask function is called in the bindTaskEvents function:
let deleteTask = function() {
    let listItem = this.parentNode;
    let ul = listItem.parentNode;
    ul.removeChild(listItem);
}
This function has a variable named listItem which stores exactly the same thing as we did in the editTask function, this.parentNode here also returns a li element and we access to the parent ul of this element then store it to the ul variable. Finally, we eliminate this li element on its parent ul by using the removeChild method.
Mark A Task As Completed
We are closer to the end, the taskCompleted helps us move a task from the to-do section to the completed tasks section.
let taskCompleted = function() {
    //When the Checkbox is checked
    //Append the task list item to the #completed-tasks ul
    let listItem = this.parentNode;
    completedTasks.appendChild(listItem);
    bindTaskEvents(listItem, taskIncomplete);
}
On line 6th, the bindTaskEvents will move the listItem from the completed section to the incomplete section of checkbox is unchecked (we already explain the bindTaskEvents function).
Mark A Task As Incomplete
The taskIncomplete function looks identical to the taskComplete function, except we call the bindTaskEvents with taskCompleted as the second argument:
let taskIncomplete = function() {
    //When the checkbox is unchecked appendTo #incomplete-tasks
    let listItem = this.parentNode;
    incompleteTasks.appendChild(listItem);
    bindTaskEvents(listItem, taskCompleted);
}
For better envision, let’s quickly take a look at how taskComplete and taskIncomplete perform in action:
Clear all the tasks
This is the last function of our to-do list app, when a clear button is activated, it will annihilate all the tasks both in the incomplete and completed sections.
let clear = function() {
    incompleteTasks.innerHTML = "";
    completedTasks.innerHTML = "";
}
clearButton.addEventListener('click', clear);
Everything we need to do is to access incompleteTasks and completedTasks variable, set their content to an empty string by using innerHTML property. Outside the function, when we click the clearButton function, this clear function will be involved.
Put all pieces together
Now we have done writing JavaScript, let’s synthesize all the functions together:
let taskInput = document.getElementById("new-task");
let addButton = document.getElementById("addButton");
let incompleteTasks = document.getElementById("incomplete-tasks");
let completedTasks = document.getElementById("completed-tasks");
let clearButton = document.getElementById("clear");
let createNewTask = function(taskName) {
    let listItem = document.createElement("li");
    let checkBox = document.createElement("input");
    let label = document.createElement("label");
    let editInput = document.createElement("input");
    let editButton = document.createElement("button");
    let deleteButton = document.createElement("button");

    checkBox.type = "checkBox";
    editInput.type = "text";
    editButton.innerText = "Edit";
    editButton.className = "edit";
    deleteButton.innerText = "Delete";
    deleteButton.className = "delete";
    label.innerText = taskName;
    listItem.appendChild(checkBox);
    listItem.appendChild(label);
    listItem.appendChild(editInput);
    listItem.appendChild(editButton);
    listItem.appendChild(deleteButton);

    return listItem;
}
let addTask = function() {
    if (taskInput.value == "") {
        alert("Task to be added should not be empty!");
        return;
    }
    let listItem = createNewTask(taskInput.value);
    incompleteTasks.appendChild(listItem);
    bindTaskEvents(listItem, taskCompleted);
    taskInput.value = "";
}

let editTask = function() {

    let listItem = this.parentNode;
    let editInput = listItem.querySelector("input[type=text]");
    let label = listItem.querySelector("label");
    let containsClass = listItem.classList.contains("editMode");
    if (containsClass) {
        label.innerText = editInput.value;
    } else {
        editInput.value = label.innerText;
    }
    listItem.classList.toggle("editMode");
}
let deleteTask = function() {
    let listItem = this.parentNode;
    let ul = listItem.parentNode;
    ul.removeChild(listItem);
}
let taskCompleted = function() {
    let listItem = this.parentNode;
    completedTasks.appendChild(listItem);
    bindTaskEvents(listItem, taskIncomplete);
}


let taskIncomplete = function() {
    let listItem = this.parentNode;
    incompleteTasks.appendChild(listItem);
    bindTaskEvents(listItem, taskCompleted);
}
addButton.addEventListener("click", addTask);
let bindTaskEvents = function(taskListItem, checkBoxEventHandler) {
    let checkBox = taskListItem.querySelector('input[type="checkbox"]');
    let editButton = taskListItem.querySelector("button.edit");
    let deleteButton = taskListItem.querySelector("button.delete");
    editButton.onclick = editTask;
    deleteButton.onclick = deleteTask;
    checkBox.onchange = checkBoxEventHandler;
}

let clear = function() {
    incompleteTasks.innerHTML = "";
    completedTasks.innerHTML = "";
}
clearButton.addEventListener('click', clear);
Finally, our achievement might look like this:

Summary
In this article, we have learned how to create a simple to-do list app with plain JavaScript. First off, it’s judicious to not go directly to the coding process, but rather sketch a demo quickly first to get a general outline of what we should do. We have listed several features to our app and we implemented all of them in JavaScript. If a function is too long to write and some of its components are possible to be written as a separate function, then we might have to find a way to proceed. We learned how to use JavaScript to interact with Document Object Model (DOM) to make our app interactable, how to activate an event using addEventListiner method.
This code is also available on Github, if you want to get informed when new articles in this series release, consider subscribing to my newsletter.
